Divine Dinner dress made from a sheer poly mesh and lined with white tricot for opacity.
The Washable Wonder Tape Tutorial is at the end of the assembly instructions below.
?
 |
| Line Drawing |
Price 99?!
When your transaction is complete, click on "Return to Savage Coco Patterns"
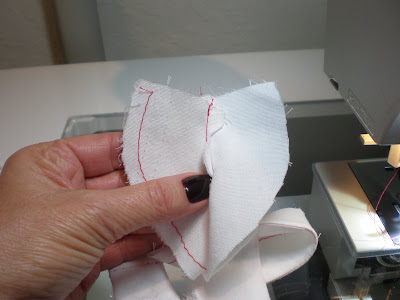
and your pattern will appear. A Divine Dinner dress inspired by Andre Courreges' designs forRomy Schnieder in the movie "LaPiscine."The Film, the Plot and the Dress: A young couple, vacationing in the South of France, mostly by the pool in the sun. They are visited by our heroine's former lover and his young daughter. While her current Mr. Wonderful is off gallivanting at the beach with the daughter (that cad), our heroine is cooking up dinner in style. She is chic and cool in an open back maxi-dress that simply floats with elegance. Featuring an all-in-one self neck/armhole band, the dress falls straight from the neckline to a fluid hem. An excellent choice to show Mr. Had It And Lost It precisely what he let get away.Pattern Notes & Skill Level: This pattern is a size Medium on 5'4" model, 36" bust. You will need to draft your size up or down. Skill level assumes intermediate and above sewing knowledge. Hook & eye closure at back neck, open back with facing, unlined. Pattern layout is not included but both dress front and back are cut on the straight grain fold. This pattern has been drafted to allow for either braless/wearing of a bra, depending on how low you decide to open the back facing.Suggested Fabrics: Fluid silks, polys, lightweight knits.Yardage Needed: 44"-45" W: 4-1/2"yrds; 52"-54"W:4 yrds.Notions: 2 hook & eyes, Featherweight interfacing, 8 - 1"squares of organza; 1/4" Washable Wonder Tape, thread.Assembly Instructions:Seams on the all-in-one neckbandare 1/4", exceptwhere noted on side seams. Dress body side seams are 5/8" French seams.This patterns allows for a 1/4"+ 1/4" rolled hem on a 5' 4" frame. All seam and hem allowances are included in the pattern, you do not need to add them.Print, assemble and cut out all .pdf pattern pieces. This pattern has 5 pieces and uses 46 sheets of 8" x 11 1/2" of paper to print. When assembled after printing it will look like this: A pattern layout is not provided however,pattern pieces are cut the on straight grain fold of fabric. Cut fabric and interfacing, transfer any markings.Interfaceone set of Front/Back armscye/neck bands. This will be the inside band. Sew Front (#3) to Back (#4) at shoulder seams only. Repeat for outside band. Butterfly the shoulder seams by pressingshoulder seams of inside band towards the Frontand outside band towards the Back, as picturedbelow.Baste a 1/4" seam allowance on the bottom selvage of the inside band only. Interfacing has been left off of the Tutorial pics of the bands. The photo below is the Tutorial's inside band - CF is on the right top of the pic and CB on the top left, shoulder seam in the middle, creating the neckline U on top and armscye upsidedown U on the bottom.Sew a 1" square of organza to each inside corner of both bands. Trim and clip to but not through small pivot points.Sew both bands together at neckline only, right side to right side. Clip curves, press and turn, wrong side to wrong side, press again. Lay out flat with one set of armscyes up and away from you and one set facing you.Utilizing the All-in-One Facing technique, beginning at the bottom set of armscyes, roll the bands up towards the top armscyes, stopping at the top shoulder seam, as pictured below.Take the top armscye and bring it down towards you, over the rolled bands, then under the rolled bandsand up to meet its match, right side to right side, encasing the rolled fabric. Sew armscye from side seam to side seam, being careful not to stitch throughany fabric encased in the tube. Clip curves, press seam then pull rolled fabric through tube. Press.Repeat the procedure for the other side. Your will now have a machine finished neckline and armscyes. ?
Open out armscyes and sew side seams at 5/"8.
Apply interfacing to back facing placket (#5). This Tutorial utilized blue organza. Press facing (if using organza,press separate ) in half lengthwise, and baste a line down the middle (stitch in the ditch) from top to bottom. Press flat. Baste raw edges at 1/4"
and choose an edge finish. This tutorial utilized a rolled hem (to marginal success).
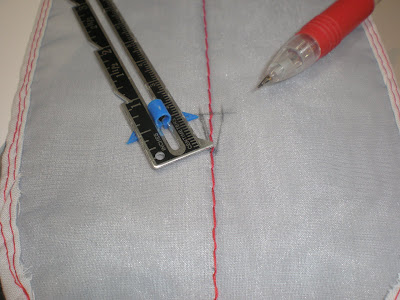
On wrong side of facing placket, draw a horizontal line at1/2" up fromthe desired back waist length opening dot (bra band or open to waist) and at1/8" to each side of the middle basting line, then draw a line from this marking to the dot, creating a stitching guide.
On back dress (#2), again presson fold line from neck edge to corresponding dot and baste a line from neck edge to dot, stitching in the ditch. Press flat. Place facing placket on dress back, right side to right side, and sew together 1/8" of either side of middle basting stitched to dot, decreasing stitch length at the 1/2" mark from dot. At dot, pivot, stitch 1-2 stitches across dot, pivot up to 1/2" mark, increase stitch length again and continue up to neck edge at 1/8" of other side of the middle basting stitch.
Cut facing open along middle basting line stitching, from neck edge just to but not through dot. Press seam towards facing and turn to inside. Understitch facing if desired. Understitching the facingis recommended on this dress to hold the facing to the inside. Baste facing to dress along neck edge.
The sample Divine Dinner dress was made from a sheer poly mesh (Hancock Fabrics) so required a lining. A white tricot purchased from Britex in San Francisco was used. The tricot lining altered the back opening facing construction only. Instead of a separate facing, a 1" stip of bias organza was laid along the back opening seam lines only instead of an interfaced facing. The stitching of the center basting lines, 1/8" of either side of same, the bottom point, turning right-side out and understitching remained the same as above
.
Sew dress front (# 1) to dress back (# 2) at side seams with a French seam (wrong side to wrong side at 1/4", press, turn right side to right side and sew again at 3/8"). Press.
Sew all-in-one outside neckband to dress beginning at back neck edge, pivoting at point(s). Clip where necessary, turn and press all seam allowances up into neckband. Press under raw edges of inside band along baste stitching.Wash Away 1/4" Wonder Tape or Steam-A-Seam aids in this step. There is a short Wonder Tape tutorial below. Stitch inside band down enclosing all raw edges. If desired, edgestitch all-in-one neck band at neckline,around armscyes and bodice seam(s). Attach hook & eye closure at neckline. Hem at desired length.
?
Complete the Look:
Invite a few friends and an old flame or two to dinner and don this captivating caftan. To complete her look, our heroine has chosen ivory espadrilles and swung her hair into a French twist (all the more to stay cool under increasingly hot circumstances) and a gold wrist bangle. Oh, and some more peach lip gloss - just in caseMr. Had It And Lost It requires akiss-off. So make this dress and create your own dramatic and Divine Dinner dress.
Heels or Esparilles?
Dine out or stay in?
Style or comfort?
One bangle or three?
Silver or Gold?
Answer:
Make TWO Divine Dinner Dresses.
One short, one long.
Now, wasn't that easy?
Tutorial
1/4" Washable Wonder Tape
The single most fantastic sewing notion. Ever.
The sample Divine Dinner dress was made from a sheer poly mesh (Hancock Fabrics) so required a lining.Awhite tricot purchased from Britex in San Francisco was used.The tricot lining altered the back opening facing construction only. Instead of a separate facing, a 1" stip of bias organza was laid along the back opening seam lines only instead of an interfaced facing. The stitching of the center basting lines, 1/8" of either side of same, the bottom point, turning right-side outand understitching remained the same as above.
Once the back opening was completed,the side seams sewn and turnedright-sideout, the two layers were treated as one and thegarment was completed as the instructions above. However, the mesh and tricotbeing quite lightweight, some seam stabilization was needed to aid in constuction both running the fabric through the machine and to keep selvages from stretching out of shape.
First, Sullivan's Fabric Stabilizer was sprayed along all the selveges - twice - letting coats dry in betweenapplication.
Second, Washable Wonder Tape was used to bastethe neckline and armsyces selvages together instead of a traditional basting stitching. You will see it used belowin photos of the dress neckline, armscyes and neckband.
Working on a flat surface, finger press the tape onto the fabric then run your nail along the first inch or so to help separate the tape from its white base.
Peel off the white base
For the neckband inside edge, roll over at the basting stitch and finger-press down. For the fashion fabric and lining, finger-presstogether wrong side to wrong side along neckline and armscyes. The dress pieces are now stabilized and ready to be sewn as one layer into the neckband.

A note on stitching the mesh: On the conventional machine,a size 9 ball point needle was used, alternating a 1.0 zig-zag width, 2.5 length for stitch runs beween the neck band corner pivot points; thena 2.5 straight stitch when both re-inforcing and stitching the pivot points. Side seams were serged but the above zig-zag would work too. Mesh does not ravel.
Enjoy!
Downloads
reff : http://savagecocopatterns.blogspot.com/2013/01/the-divine-dinner-dress.html