Selasa, 24 November 2015

BerduĹŸ Meyhane - BerduĹŸ Club | Trio MimarlÄąk

?zmir e?lence hayat?na Trio Mimarl?k? tan bir imza daha..
?zmir? in gece hayat?na y?llar?n deneyimli ismi Tibet zer yepyeni bir mekan kazand?rd?. Son y?llar?n tercih edilen e?lence kltr meyhane ile, gece klubn, tek bir isim alt?nda birletirdi. Food & beverage alan?ndaki tasar?mlar? ile tan?d???m?z Trio Mimarl?k, Berdu Club ve Berdu Meyhane konsepti ile e?lence sektrnde de ses getirece?e ve ak?llarda yer edece?e benziyor.
Trio Mimarl?k? ?n baar?l? ortaklar? Mimar Selin Ok ve Mehlika M?ho?lu ??Berdu Club tasar?m?m?z?n ?k? noktas? ??k ve ??k oyunlar?yd?, tm mekanda gerek duvar ka??d? gerekse di?er malzemeler ????n etkisiyle bambaka renklere ve dokulara brnyor. Bu da mekana dinamizm kazand?r?yor.
Club giriinde ok zel bir dekorasyon sizi kar?l?yor ve e?lenmek istedi?iniz alana do?ru ynlendiriyor. Daha girer girmez sizi byleyen tasar?m? ile bir sonraki ad?m? merak ettiriyor.
Merdivenlerden ?kt???n?zda capcanl? renkli bir mekana ad?m at?yorsunuz. Gelen misafirlerin kendilerini zel hissedecekleri zel localar bu projemizde de var. Localar?m?z farkl? renk ve ekillerde, fuya renkte tasarlad???m?z taht localar?m?z yksek oturmalar? ile mekana hakimiyet sa?larken, hardal yuvarlak localar?m?z rahat?na ve keyfine dkn olanlar iin bir alternatif sa?l?yor.
Berdu Meyhane blmnde ise, ta duvarlar?n do?al ve ihtiaml? havas? sizi bir anda baka bir zaman dilimine gtryor,
Turkuaz ve dorenin muhteem uyumunu mekan?n her yerinde kulland?k. ?ddial? ve ??lt?l? sahne tasar?m?m?z? byk bir avize ile vurgulad?k, tavandaki grseller, duvarlardaki aynalar, localarda kulland???m?z kumalar hepsi mekan?n do?al dokusuna uyum sa?larken bir yandan da mekandaki e?lenceyi ve cokuyu pekitiriyor.. ?? eklinde mekan? tan?ml?yor.


reff : http://trioizmir.blogspot.com/2014/11/berdus-meyhane-berdus-club-trio-mimarlk.html

reff : http://trioizmir.blogspot.com/2014/11/berdus-meyhane-berdus-club-trio-mimarlk.html

Tower Menara Lampu Stadion Sepakbola Narasinga Kota Rengat-Indragiri Hulu, Riau. Gambar diambil Desember 2012


Tower Menara Lampu Stadion Sepakbola Narasinga Kota Rengat-Indragiri Hulu, Riau. Gambar diambil Desember 2012


reff : http://helorigrahasarana.blogspot.com/2013/01/tower-lampu-stadion-sepakbola-narasinga.html

reff : http://helorigrahasarana.blogspot.com/2013/01/tower-lampu-stadion-sepakbola-narasinga.html

Pendiente y ĂĄngulo de inclinaciĂłn de una recta - Calcular.

Pendiente y ngulo de inclinacin de una recta

El ngulo de inclinacin de una recta es el ngulo que forma con el eje x. La medida del ngulo se toma en sentido contrario a las agujas del reloj.
La pendiente o tangente de un ngulo determina el ngulo de inclinacin de la recta, es lo que se llama tangente inversa.


Pendiente: Calcular

Lapendientees lainclinacinde la recta con respecto al eje de abscisas.
Lapendientede unarectaes latangente del nguloque forma larectacon ladireccin positiva del eje de abscisas.


Formulas

Calcular la pendiente por dos puntos dados
Calcular la pendiente dada por un ngulo.
Calcular la pendiente dada la ecuacin de la recta.


reff : http://tareasdealumnosaalumnos.blogspot.com/2015/10/pendiente-y-angulo-de-inclinacion-de.html

reff : http://tareasdealumnosaalumnos.blogspot.com/2015/10/pendiente-y-angulo-de-inclinacion-de.html

REFORM AWARD UNTUK SLANK


Pulang kantor, baru saya dengar di radio mobil bahwa Slank menerima penghargaan yang dinamakan Reform Award dari BEM (Badan Eksekutif Mahasiswa) se-Jabotabek, atas kepeduliannya dalam sosialisasi pemberantasan korupsi.

Penasaran, kubawa keluar koran Jurnal Nasional sewaktu aku mampir untuk ngiras (makan di tempat) Indomie Goreng di warung tenda Mas Agus di pinggir Jalan Pramuka, hanya beberapa puluh meter sebelum rumah yang saya tinggali. Saya memang niat mau nyantai dulu di situ.

Dan memang benar. Ada berita foto yang cukup besar di halaman 8. Reform Award diterimakan hari Kamis (08/01/09), dan diterima oleh seluruh personel Slank yang hadir lengkap saat itu.

Saya ikut senang, karena kebetulan saya adalah salah satu penggemar mereka. Satu "prestasi" lagi mereka peroleh.
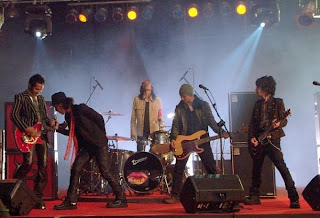
***

Siapakah Slank?

Saya yakin tak ada yang tak tahu tentang nama Slank ini. Minimal mendengar, bahkan saya yakin sebenarnya sangat familier di telinga setiap orang muda Indonesia. Orang tua juga; mungkin.

Ya, Slank yang bercikal bakal dari grup band bernama Cikini Stones Complex (CSC) dan terhitung sudah 14 kali ganti personil --dari Bimo Setiawan alias Bimbim (drum), Boy (gitar), Kiki (gitar), Abi (bass), Uti (vokal) dan Well Welly (vokal) pada formasi pertama hingga Bimbim (drum), Kaka (vokal), Ivanka (bass), Ridho (gitar) dan Abdee (gitar) pada formasi terakhir-- itu memang sudah bisa digolongkan sebagai grup band legendaris.

Mereka "lahir" pada Desember 1983, dan sampai sekarang masih eksis, bahkan tetap terkategorikan sebagai band papan atas. Tak kurang dari 18 album telah mereka keluarkan. Dari Suit-Suit....Hehehe (Gadis Sexy) di tahun 1990 sampai The Big Hip di tahun 2008 ini.

Selain kehebatan itu, tentu semua juga ingat cerita negatif tentang mereka. Cerita negatif, yang pada akhirnya ber-ending sangat membanggakan. Ya, seputar keberhasilan mereka lepas dari jeratan narkoba yang menghinggapi hampir seluruh personilnya, hingga pentasbihan diri Slank sebagai duta anti narkoba, dengan dukungan penuh Sang Bunda Iffet tersayang. Seorang ibu yang benar-benar mampu berperan sebagai orang tua, manajer dan pengarah kehidupan anak-anak Slank.

Kisah sukses mereka memang sangat inspiratif.

Saya masih sangat ingat, ketika tahun 1993 saya dan teman-teman di fakultas mengundang mereka manggung di Solo. Sejak kedatangan, saya berkesempatan menemani mereka. Saat datang, makan, jumpa pers dan wawancara di radio, di hotel, di kampus, bahkan nongkrong berdua dengan Kaka di warung soto depan hotel.

Saya ingat, ada "syarat" yang mereka kemukakan secara kelakar tapi serius, yakni kesediaan panitia menyediakan Ciu Bekonang. Ciu adalah minuman keras lokal Solo (lebih tepatnya Sukoharjo), yang bagi penduduk setempat dikenal punya daya mabuk yang cukup tinggi.

Mereka meng-"oplos" ciu dengan --entah apa-- yang dibawanya dari Jakarta. Istilah mengoplos mungkin kurang pas. Lebih tepat, mengkombinasikan. "Mengkolaborasikan". Mungkin dengan cimeng. Mungkin dengan bubuk narkoba. Saya nggak tahu pasti.

Hasilnya, salah seorang kawan yang "raja mabuk" di kampus saya pun fly hanya karena membaui asap yang keluar dari lintingan manual anak-anak Slank, berbarengan dengan "upacara" minum-minum. Baru asapnya doang, sang jagoan pun terkapar. Bahkan tak sanggup bangun di waktu ia harus bangun!

Intinya, dulu anak-anak Slank memang sempat "rusak". Rusak parah. Namun ternyata, mereka bisa melalui ujian berat itu, hingga pada akhirnya mereka tidak ada lagi ketergantungan sedikitpun dengan obat-obatan terlarang.

***

Apa yang sesungguhnya mau saya sampaikan adalah : tak ada imej negatif atau citra jelek yang tak bisa kita lepaskan dari diri kita, jika kita memang mau berubah. Slank telah membuktikannya.

Tak perlu waktu yang terlalu lama bagi Slank untuk mengubah imej dari the loser (karena kenakalannya" dan kekalahannya melawan godaan narkoba), untuk kemudian menjadi the winner --bahkan the hero-- untuk berbagai hal positif. Sebagaimana kita tahu, Slank tak hanya lekat dengan kisah heroik keterbebasan mereka dari narkoba, tapi juga konsistensinya dalam menyerukan gerakan antikorupsi. Mereka bahkan berkesempatan manggung di KPK, dan juga bernyanyi bersama Ketua KPK Antasari Azhar. Juga penghargaan dari Menteri Pemuda dan Olahraga Adhyaksa Dault, berupa penghargaan ?Inspirator Anak Bangsa?.

Kalau Slank yang sempat "rusak parah", kini bisa menjadi "teladan" bagi kita dengan komitmen dan kekonsistenannya untuk berubah, apalagi kita yang mungkin sebagiannya tidak pernah rusak; ataupun kalau pernah rusak tidak sampai kepada tingkatan yang "parah"?

So, jangan terlampau sedih bila kita saat ini masih memiliki cap negatif. Baik di dalam lingkungan keluarga, kelas, kantor, masyarakat kampung, atau bahkan kelompok masyarakat yang lebih besar. Yang terpenting, kita mau merubah imej itu atau tidak. Kalau ya, segera laksanakan sekarang juga. Kemudian, jaga komitmen dan konsistensinya.

Tuhan Maha Bijaksana, dan saya yakin, Ia akan menunjukkan "Sang Saat", "Sang Waktu" itu untuk kita. Saat di mana imej kita menjadi baik, dan bahkan ketika orang mengingat keburukan kita, maka yang diambil sebagai hikmah adalah kemampuan kita untuk membalik itu semua. Membalik segala sesuatu yang buruk, menjadi baik dan baik sekali.

Hmm... yakin bahwa kita bisa, bukan?


Salam,

Fajar S Pramono


Ilustrasi : http://photos-867.friendster.com

reff : http://fajarspramono.blogspot.com/2009/01/reform-award-untuk-slank.html

reff : http://fajarspramono.blogspot.com/2009/01/reform-award-untuk-slank.html

Senin, 23 November 2015

How to Adjust Scale on a Pepakura Model


Now this tutorial is going to be something a bit different than the usual. In this tutorial, I'm going to show you how to properly scale a wearable pepakura model so that it will fit you perfectly!


Materials
- Pepakura Designer 3
- Pepakura model
- Fullbody reference picture
- Half a brain

Total cost estimate: $40
(based off what I had to buy)
Currently selling for: $10

Project Duration Estimate: 5 minutes!

Everything can be found online for this tutorial

Overview:
This is a very quick and easy process by which you can re-size pepakura models to fit your body. It can be done with most models.

WARNINGS:
There is nothing dangerous about this tutorial

Always make sure you read through the entire process before beginning to avoid mistakes and get a general idea of how the project will progress.
Now let's make get started:


Step 1: Getting a reference picture
The very first step in this tutorial is to find a full-body reference picture of the character who wears the certain piece, or anyone who you'd like the ratio to be similar to. In other words, I'm going to be doing a couple Daft Punk helmets, so my best bet would be to find a fullbody photo of Thomas and Guy-Manuel. However, if I couldn't find a fullbody photo of them, it's alright for me to use another picture of someone wearing an outfit of theirs if I like the size of the helmet. Do NOT use paintings or drawings, as good as they may be, they are probably not as accurate when it comes to anatomy (not to diss anyone's art or anything). I managed to find a nice, fullbody picture of both Guy-Manuel and Thomas, so I lucked out.


Step 2: Taking measurements
Now this is a very crucial step. It's not at all difficult, but it must be done as accurately as possible to get the best results in your overall ratio. Take a ruler (preferably a bendable one or a measuring tape) and measure the height of the model you've found the picture for in cm. Then, measure their headpiece, chestpiece, legpiece, or whatever else you want to size (in cm as well). Once you've gotten both measurements, all that's left is to take your own height down and convert it to cm. If you don't know your own height to the inch, then you're going to need to take your measurement. For this, you're probably going to need someone to help you out and hold the tape or ruler while you stand as straight as you can. One trick I like to do when I'm alone is to stand up straight and use a pencil to make a very light mark along a door or wall and then just measure the wall up to that point. There are many ways to do it, just make sure it's accurate! Once you've gotten your measurement, you're going to need to convert it to cm. Reason being, pepakura model measurements go by mm. You can either take your measurement and do the math yourself (an inch is approximately 2.54 centimeters) or just type it into google. Once you get the cm, just move the decimal place over once to the right and you've converted it to mm.

Step 3: Doing the math

Now there's endless ways you can go about doing the calculations to get the magic number you're going to need for your model, but we're going to go into a couple simple methods I find are easy to grasp the concept of. If you can understand the meaning of the equations you're doing, then you won't even have to remember any formulas and it will just come naturally. That's right, we're going to be doing MATH. That stuff is useful? Apparently so.

Method 1
When it comes to doing the first method, everything is laid out in the actual problem, but grasping the meaning may be a bit difficult. You essentially have to think of it as finding a missing number using ratios. It's very simple and many of you have probably learned it before. Simply take your 3 known numbers and arrange them into a ratio problem (which has 2 fractions set equal to each other). Set both demoninators to the same aspect (person height) and then the numerators to the same aspect (helmet height) and then set them equal to each other. Cross-multiply the factors together and then divide to seclude the x term. In this method, your x term will be equal to the height or your helmet. I've included a picture that explains the method in more detail, along with an example.

Method 2
The second method is a bit easier to do, but it requires an extra step. Typical math, it's never just easy lol. But it really is, don't get discouraged. In the second method, we are trying to find a factor by which everything is multiplied rather than the exact measurement. In other words, your model that we measured from the picture is obviously much smaller than a real person. So when we tackle our second model, we are solving to find a number that can be multiplied to our very small helmet measurement and cause it to become a very realistic size. For example, if I'm 50 inches tall and I measure a helmet that's only 2 inches and a figure that's 5, then I can try to solve for the certain NUMBER rather than my exact measurement. So I can look at it like, how many times would I have to multiply 5 inches to make it 50 inches? well, 10 of course. So then you take the 10 and multiply it by 2 and you have your exact helmet size. I've drawn a picture and explained this method as well.


Step 4: Scaling the model
Now for the quickest step. To scale your model, all you have to do is open your pepakura designer and edit the information. Here is where things may get pricey. Yes, unfortunately you have to pay for pepakura designer, and that's the piece of software you need to re-scale models. It's around $40, but it's useful if you're going to be making models. It's also pretty imperative since most models are made extremely large in the event that their designers KNOW that they're going to be used to make actual props. If you're not sure if your model needs to be resized or not, check the actual file. Most of the time, the designer will have a note that says "Check scale before printing" or something along those lines. If not, simply check the scale yourself. Checking the scale can be done with the free Pepakura Designer software, but you will not be able to save any work or changes made to the model. The models I used had to be re-sized, and unfortunately, I didn't know until I was halfway done with the damn papercraft. So anyhow, either dish out the money and buy your own software or try to find someone who has it already and trick them into doing it for you.

If requested, I will be willing to re-scale and print your model on cardstock for $10 (shipping included). I'll even do the math for you ;) Simply send me an email if you're interested.

If not, you'll just have to try to get by with what you can :')


So anyway, let's get to actually programming it into the system. In Pepakura Designer, on the top right of the screen, open your 2D menu and scroll down to 'change scale', and then 'scale factor'. A popup will appear and it will show you the current measurements of the model. I have Pepakura Designer 3, and it shows up in mm (hence why I said it may be necessary to convert to mm earlier). Change the HEIGHT of the model to the measurement in mm you got. *Hint* it should be in the hundreds, not the tens. If it's a 2 digit number, you probably need to add another zero.


Step 5: Moving the print arrangement
Once you've rescaled your model, the printing arrangement will shrink and cause the models to be scattered across page boarders. Simply click and drag the pieces to new pages and make sure than none run off the edge of the page. Don't forget or you'll have a big ol mess once you print your scattered pieces.

And there you have it! A nicely scaled model that's bound to fit you like a glove!

For more information on purchasing jewelery and other props in my tutorials, requesting a custom item, or an idea for a new tutorial, feel free to email me at Kanti-Kane@hotmail.com (:

reff : http://kantikane.blogspot.com/2011/07/how-to-adjust-scale-on-pepakura-model.html

reff : http://kantikane.blogspot.com/2011/07/how-to-adjust-scale-on-pepakura-model.html

Two pastel portrait drawings by Winold Reiss


Isamu Noguchi, circa 1929. (Detail of below.)

The beautiful, brilliant young sculptor at twenty-four. The beautiful, brilliant young poet at twenty-three. I love these two portraits, both of them a wonderful balance of graphic delicacy and compositional drama, a blending of a cool, classical refinement and the vivid spirit of "The Jazz Age".

Langston Hughes, 1925.

***

F. Winold Reiss (16 September 1886, Karlsruhe ? 23 August 1953, New York City), German-born American artist, graphic designer, and interior designer; he is best known for his portraiture. He was born the second son of Fritz Reiss, a well-known artist of landscape and peasant scenes. In his youth, Reiss traveled in Germany with his father who was intent on studying peasants of particular types, an activity and a nearly ethnographical interest which would inform the son's own future artistic sensibilities. Reiss later went to Munich where he attended both the Royal Academy of Fine Arts, where he studied with Franz von Stuck, and the School of Applied Arts. In 1913 he emigrated to America, settling in New York City, where he quickly became known for his colorful graphic designs and for his commercial interiors.

Reiss was incredibly inspired by America's great ethnic diversity, and he is most remembered for his sensitive and objective portrayals of Native Americans, African Americans, and other racial and ethnic minorities. Living in New York, he was a witness to the Harlem Renaissance and portrayed many of its leading figures, and he traveled around the country and in Mexico, his work celebrating ordinary and often marginalized people. He was perhaps most drawn to Native Americans, especially the Blackfoot; he made more than two-hundred and fifty portraits of Native people. When he died at the age of sixty-six, he was cremated and his ashes were spread by the Blackfoot along the eastern edge of Glacier National Park.


reff : http://godsandfoolishgrandeur.blogspot.com/2015/04/two-pastel-portrait-drawings-by-winold.html

reff : http://godsandfoolishgrandeur.blogspot.com/2015/04/two-pastel-portrait-drawings-by-winold.html